Wednesday 11 January 2017

Steampunk multimedia

So, I decided to try something very different today. I've been watching a lot of shows on multimedia, and becoming extremely interested in the whole steampunk thing.
Unfortunately, I didn't take any pics during making it. But, I'll try to explain as best I can how I made it, and what materials I used.
Firstly, I painted the MDF art board in a layer of white gesso. Once that had dried I put the stencil over half of the board and spread the texture sand paste through it. Then I painted a layer of the acrylic paint over the whole thing.
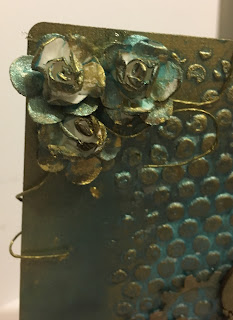
Once that had dried I applied some distress ink to a few areas, and highlighted areas with the gilding wax, especially the textured area.
Meanwhile, I die cut the cogs and gears onto kraft card, and stained them with the distress ink, then added bits of the acrylic paint and gilding wax. I also did this to the wooden embellishments and the paper flowers.
I then stamped "To your own art be true" to the board.
Using Collal 3D glue gel, I added all the components.
It was a very messy make, but very enjoyable indeed ๐Ÿ˜Š

Materials used:

MDF art board - inkylicious.co.uk
Pebeo white gesso
Tim Holtz stencil 'bubbles'
DecoArt texture sand paste
DecoArt dazzling metallic acrylic paint - Peacock Pearl
Walnut Stain distress ink
Pebeo Empire Gold gilding wax
Sara's signature collection, just for men, cogs and gears dies
Kraft card
Wooden clock and frame - The Works
White paper flowers
Leonie Pujol 'Hey there dreamer' rubber stamp set
Collal 3D glue gel




Wednesday 4 January 2017

Decorative storage PART 2

welcome back ๐Ÿ˜ƒ

When fitting your papers, always measure slightly larger, and cut away after with a craft knife.


For the rest, I used a luxurious paint from Imagination Crafts, purchased from Hochanda. They come in a pack of four:
Red, Green, Platinum, and Gold. I used the red. Hope you like ๐Ÿ˜Š


Decorative storage PART 1

Hey,

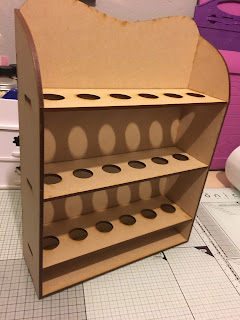
So, today, I've been getting a lil messy, and decorating some of my storage.
I have a couple of Creative Expression's 'smoothie holders' They house the mini blending smoothies,
Which are my go-to blenders when using distress ink.
That being said, I use this particular storage for my stickles glitter glues.
I've done a little step-by-step picture tutorial below.

Here is how the storage unit started life ๐Ÿ˜‰


To cover the sides and the back board I used Crafter's Companion's 'Downton Abbey' 12x12 papers.
These papers are so beautiful, I love them. I used two sheets of the same design.


To adhere the paper to the mdf, I used collal Tacky glue. Love this stuff, it sticks everything!! ❤


Monday 2 January 2017

Butterfly Lantern

I created this butterfly lantern as part of Crafter's Companion design team.
I used the fabulous, Darice butterfly mosaic embossing folder, which I used to emboss onto acetate, and then coloured, using the Spectrum Noir alcohol markers. This gave it a lovely stained glass effect.
I used the luxury gloss red mirror card from Crafter's Companion to make the base and lid, which comes in a pack of 30, and you get 10 of the gloss, 10 of a gorgeous muted mirror card, and 10 spectacular sheets of non shedding glitter card.
I added a battery powered tea light inside, to show the effect given by the coloured acetate exterior.
I've added a pic of when it was shown on Hochanda ๐Ÿ˜Š